Installation on a Single Exchange Server
Please note: You need administrative privileges for the installation. For the installation in cluster environment you need privileges to create a new domain user account too.
- Download the appropriate Plugin for Microsoft Exchange Server from our web site and save it to disk.
- A double click on the msi-file starts the Microsoft Windows Installer. Simply follow the on-screen instructions. Chose Installation on a Standalone Exchange Server and klick 'Next'.
- If needed, change the location for the filter databases. Verify the domain and enter a user account (user logon name) with an existing mailbox. The install will use this account to determine the mailbox store. For information howto register the filter for additional mailbox stores, see below. Click 'Next'.
- Mark Provider Mode if you want to unlock the filter for the users manually (e.g. as a provider you like to register only customers with premium subscriptions). If the filter should work for every user at startup, leave this optional setting unmarked. For more information about Provider Mode see below. If the filter should write a single log entry for incoming mail, mark Enable Debugging.
- Chose an Installation Folder and install the filter marked Just me.
- After the installation the filter is up and running. It creates a Spambox folder for every user - as soon as a new mail arrives for the user - and sends a short Users Manual to the user account.
Installation in Exchange Cluster Environment
- Install the filter on the first Exchange Server which has control to the shared resources. Simply follow the instruction for Installing on a Single Exchange Server above but chose Installing on an Exchange Cluster Server. As storage location for the filter databases choose a cluster group resource on a SAN (e.g. X:\SpartacusDB if X: is your shared Exchange database volume). If the first server failed, the filter on the second server must have access to the same filter databases! During the installation the installer creates a new domain user "__spartacus__" and will ask you for a password. The password must meet your own password policy!
- Install the filter on the next Exchange Cluster Server but only if it has access to the shared resources. So if you have an active/passive cluster you have to move the group to the second server.
First settings and tests
Register/Unregister the filter for further exchange stores
After a default installation the filter works on the mailbox store the user (you entered in the installer dialog) belongs to. If you have more than one store you have to register for additional stores manually.
- Install the Exchange SDK utility "regevent.vbs" if not already installed.
- Look for the unique store id {xxxxx-xxxx-xxxxx-xxxxx} the filter is not registered already. To do so, open Exchange System Manager, click Servers - SERVERNAME - xxx Storage Group - Mailbox Store - Mailboxes. On the right side you will find SystemMailbox{YOUR-ID}.
- Create the file register_spartacus.cmd and type in the following 3 lines using that
store id and your own domain name:
@echo off

                    cscript regevent.vbs add onsyncsave spartacusfilter.exchangefilter file://./backofficestorage/ADMIN/YourDomain.com/MBX/SystemMailbox{xxxxxxxx-xxxx-xxxx-xxxx-xxxxxxxxxxxx}/StoreEvents/GlobalEvents/spartacus.eml
                    -m ANY -p 2147483647 -f "WHERE $"DAV:contentclass"$ = 'urn:content-classes:message'"

pause - Run this file from the command line and check for errors.
- To display the registration(s) create a file enum_spartacus.cmd, type in the following
3 lines:
@echo off

                    cscript regevent.vbs enum file://./backofficestorage/ADMIN/YourDomain.com/MBX/SystemMailbox{xxxxxxxx-xxxx-xxxx-xxxx-xxxxxxxxxxxx}/StoreEvents/GlobalEvents/
                    all

                    pause
and run it from the command line. - To unregister the filter create a file unregister_spartacus.cmd, type in the following
3 lines:
@echo off

                    cscript regevent.vbs delete file://./backofficestorage/ADMIN/YourDomain.com/MBX/SystemMailbox{xxxxxxxx-xxxx-xxxx-xxxx-xxxxxxxxxxxx}/StoreEvents/GlobalEvents/spartacus.eml


                    pause
and run it from the command line.
Unlock the filter for a single user in Provider Mode
If you installed the filter in Provider Mode the filter ignores all user
accounts until you unlock the account. To do so, create an empty file "USERNAME.dat.create"
in the folder $DATABASEFOLDER\YOURDOMAIN\.
Example: Create "C:\SpartacusDB\MyDomain.com\tom.dat.create" if
you want to unlock user "tom" and your domain name is "MyDomain.com".
The filter will initialize a new filter database "tom.dat" and deletes the .create
file as soon as a new mail for user tom arrives.
Use "Junk E-mail" folder instead of "Spambox" (experimental)
Depending on the release version of Microsoft Exchange Server the mail databases
contains a folder "Junk E-mail". SpartacusFilter can use this folder instead of
the "Spambox" for more convenience. Please set the following registry key (string
value):
[HKEY_LOCAL_MACHINE\SOFTWARE\Spartacus]

                "UseJunkMailFolder"="Junk E-mail"
Please note: Microsoft did not hard coded this name, so if you
have a multilanguage user environment add all Junk-Mail folder names here, separated
by ";". For a mixed german/english environment set:
[HKEY_LOCAL_MACHINE\SOFTWARE\Spartacus]

                "UseJunkMailFolder="Junk E-mail;Junk-E-Mail")
Enable a White List (manual / automatic)
You can define a lot of email addresses in a White List. The filter checks this
list and forces all mail from that addresses to HAM. There is a White List for every
user in the SpartacusFilter database directory with the same name as the filter
database but an additional suffix ".wlt" (e.g. USERNAME.dat.wlt). To enable the
White List feature set the following registry key (dword value):
[HKEY_LOCAL_MACHINE\SOFTWARE\Spartacus]

                "UseWhiteList"=dword:00000001
Create the white list file "USERNAME.dat.wlt" as text file and add the email addresses
("USER@DOMAIN.TLD") here (line by line).
If you like to white list a complete domain add the a line "@DOMAIN.TLD".
To automate the white list creation set the following registry key:
[HKEY_LOCAL_MACHINE\SOFTWARE\Spartacus]

                "AutoWhiteList"=dword:00000001
The filter will automatically create a white list and add the email sender address
if a user moves a mail from the Spambox back to the Inbox.
You can set up a global white list by creating a file "global.wlt". Use the same
syntax for adding sender addresses and complete domains as described above. To use
the global white list set the registry "UseWhiteList" to 1.
DebugLevel / Logging
To trace the work of SpartacusFilter and/or debug in error cases enable debugging
by setting the following key:
[HKEY_LOCAL_MACHINE\SOFTWARE\Spartacus]

                "DebugLevel"=dword:00000001
(0 = no debug, 1 = minimal debug, 2 = extended debug, 3 = max debug)
You'll find the debug file at C:\SpartacusDB\Spartacus.log. Trace this
file with a tool like tail or open it with notepad.
Automatically created Users Manual
After installing, each user will get a short instruction mail (as soon as a new mail arrives) how to use the Spamfilter. But it's a good idea to inform the user before the installation.
The "Spambox" / "Junk E-mail" folder
The filter creates a new folder named Spambox in each user's mailbox. The user has to train the filter by moving all incoming SPAM into the Spambox. If you set "UseJunkMailFolder="Junk E-mail" in the registry the filter will not create a Spambox. The Junk Mail folder will be used in the same way as the Spambox. A user, who got a Spambox (as a result of incoming mail) before you changed this setting, can delete this folder.
The global spam profile
A global default spam profile is provided by the installation. In addition, the
Administrator can provide a globally used customized spam profile for higher detection
rate (see FAQ: How to provide a customized profile). The profile will increase
the detection rate of the filter for the first time (learning phase) and will be
disabled after an amount of collected SPAM mails. Set the following registry key
if needed:
[HKEY_LOCAL_MACHINE\SOFTWARE\Spartacus] (decimal 250)
"ProfileIgnore"=dword:000000fa
To disable the use of the profile set this value to 0.
How does the filter works - some implementation details
When the Filter is running it is examining the content of each incoming email (separately
for each user) and gathering data that will be used to analyze new mail as it arrives.
The user trains the filter by moving SPAM into his/her (user related) Spambox. The
more spam the user deletes, the better Spartacus is at identifying it.
Please note: All mail content residing outside the Spambox is identified
as GOOD, all content residing in the Spambox is identified as BAD. So the users
Inbox must not contain any new received spam mails if the filter
should be working properly!
Whenever new mail is received, Spartacus checks each one and determines whether
or not it's spam. If it's spam, it is automatically moved into the Spambox folder.
Otherwise it remains in the Inbox.
Please note: The filter starts to move SPAM automatically into
the Spambox after 20 good mails (HAMs) are received. This prevents from a higher
False Positives rate at startup (training phase).
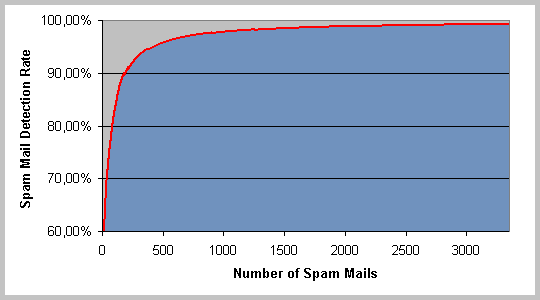
The following chart shows the behaviour of the Filter without any profile.
Spartacus is using Web Storage System events. Web Storage System events provide a mechanism through which applications can execute code whenever an item is saved, deleted, moved, copied, or modified within the store. Spartacus is implemented as a so called Exchange event sink (a dynamic link library) running within a COM+ Application package (see Administrative Tools->Component Services). The necessary standard user identity "__spartacus__" is created by Spartacus installation process. Usually administrative privileges are not required! In cluster environment the installer creates a domain user to ensure the correct access permissions to the filter databases. In single server mode it tries to create a local user. You can use the Exchange SDK Utility "regevent.vbs" to see Spartacus event sink.
Glossary of registry keys
[HKEY_LOCAL_MACHINE\SOFTWARE\Spartacus]

                "UseJunkMailFolder"="Junk E-mail" (""=Spambox (default), "Junk E-mail"=Junk E-mail
                folder, multiple names are separated by ";")

                "ProfileIgnore"=dword:000000fa (0=no profile, 250=ignore profile after 250 Spam
                mails)

                "DebugLevel"=dword:00000000 (0..3 see above)

                "ProfilePath"="C:\\SpartacusDB\\profile.def" (alternative profile name)

                "ProviderMode"=dword:00000000 (0=scan all user mails, 1=scan only user with existing
                dat file)

                "UseWhiteList"=dword:00000000 (0=disable white list, 1=enable white list)

                "AutoWhiteList"=dword:00000000 (0=disabled, 1=enable automatically creation of white
                lists)

                "StatisticsPath"="C:\\SpartacusDB" (used by installer)

                "InstallMode"=dword:00000001 (used by installer)

                "EXDomain"="yourdomain.com" (used by installer)

                "MailUser"="Administrator" (used by installer)
Please note: After changes at the registry keys please restart the filter:
- Start the management console for Component Services (Administratives Tools - Component Services).
- Select "Spartacus Spam-Filter for Exchange" from COM+ Applications.
- Restart the component (Action - Shut down and Action - Start).
How to uninstall the filter
To completely uninstall the filter use Add/Remove Software from the Control Panel. The filter databases will not be deleted.
Update of the filter engine
We do not release separate updates for the filter engine. You can install a newer version (see download site) without uninstall the old version. All settings and the filter databases will be preserved.
Please note: The filter does not need any regulary updates (like black or white lists) to work.